

So, what does it really take to photograph jewelry well? It's a delicate dance between using the right lens—usually a macro—and controlling your light to be soft and diffused, which is key to killing harsh glare. You're aiming to blend the right camera settings, like a high aperture (f/11 or more) for that tack-sharp focus, with smart editing to make every facet and detail pop.
Why Great Jewelry Photos Matter
In the world of online shopping, your photos aren't just pictures; they're your digital storefront, your virtual salesperson, and your brand ambassador all rolled into one. Customers can't hold a piece, feel its weight, or see how it catches the light. Your images have to do all that heavy lifting for them.
A crisp, beautifully lit photo builds instant trust. It communicates quality, texture, and craftsmanship before a customer even reads the description. On the flip side, a blurry or poorly lit image can make even the most stunning piece look cheap, potentially costing you a sale.
Stunning images sell an experience, not just a product. They help a person imagine that delicate necklace on their own skin or that sparkling ring on their finger. This creates an emotional pull that words alone just can't match. It’s especially critical for items like personalized photo jewelry, where capturing the tiny, intricate details is everything.
A great photograph bridges the gap between the screen and the customer's hands. It has to communicate the weight, feel, and quality of the piece without a single word.
The Impact on Your Brand
In a sea of online sellers, your photography is what makes you stand out. It’s the visual handshake that separates a premium, trustworthy brand from an amateur one. With more and more jewelry sales happening online, top-notch imagery isn't a luxury anymore—it's the bare minimum to catch a modern shopper's eye.
Before we dive into the nitty-gritty, let's get a bird's-eye view of what a successful shoot involves. This checklist breaks down the essentials we'll be covering.
Essential Jewelry Photography Checklist
| Component | Recommendation | Why It's Important |
|---|---|---|
| Camera & Lens | DSLR/Mirrorless with a 100mm Macro Lens | Captures fine details and textures with incredible sharpness. |
| Lighting | 2+ Off-camera flashes with softboxes or a lightbox | Creates soft, even light that minimizes harsh reflections and glare. |
| Tripod | A sturdy, reliable tripod | Ensures complete stability for crisp, blur-free shots at slow shutter speeds. |
| Background | Neutral, non-reflective surfaces (e.g., matte paper, linen) | Prevents distracting colors or reflections, keeping the focus on the jewelry. |
| Camera Settings | Aperture: f/11-f/16, ISO: 100, Shutter: Adjust as needed | Maximizes depth of field for overall sharpness and produces clean, noise-free images. |
| Styling Props | Simple props like ring stands, acrylic blocks, or natural elements | Adds context and visual interest without overpowering the main piece. |
This guide is your practical roadmap. We're here to prove you don't need a massive, expensive studio to get incredible results—just the right know-how.
We’ll walk you through how to:
- Pick the right equipment without breaking the bank.
- Become a master of light to banish reflections and make gems sparkle.
- Nail your camera settings for consistently professional shots.
- Style your jewelry to create compositions that stop the scroll.
Choosing the Right Gear for Jewelry Photography
You don't need a Hollywood-sized studio to get stunning jewelry photos, but picking the right gear is your first real step toward professional results. The equipment you choose has a direct line to how well you can capture those tiny, brilliant details that make a piece of jewelry impossible to resist.
At the heart of it all is your camera. Smartphones are getting better every day, but a DSLR or mirrorless camera is a massive leap forward. These cameras hand you the keys to manual control, letting you dial in settings like aperture and ISO. That control is what it takes to get the razor-sharp photos that actually sell jewelry.
The Macro Lens: Your Most Important Tool
If you're going to splurge on one thing, make it a macro lens. I can't stress this enough—it's the single most critical piece of equipment for this job. Macro lenses are built specifically for extreme close-ups, letting you capture intricate filigree and tiny gemstone facets with a level of sharpness a standard lens can only dream of.
You'll typically see two common options: 60mm and 100mm. Here’s what that means in the real world:
- A 60mm Macro Lens: A great entry point. You'll need to get physically closer to the jewelry, which can sometimes feel a bit cramped, but it's totally workable for most tabletop setups.
- A 100mm (or 105mm) Macro Lens: This lens gives you more breathing room. The longer working distance means you can be further back from the jewelry and still get that perfect 1:1 magnification. This is a huge help in avoiding unwanted shadows or reflections from your camera.
For most photographers, a 100mm macro lens is the smarter long-term investment. The flexibility it offers is well worth it.
The Unsung Heroes of a Sharp Photo
Getting a great shot goes beyond just the camera and lens. A few other pieces of gear are absolutely essential for clean, pro-level images. Think of them as the supporting cast that turns a blurry, amateur photo into something you’d see on a high-end retail site.
First up, a sturdy tripod. To get everything in focus, you'll be using settings that require a slower shutter speed, which makes your camera hyper-sensitive to any movement. A tripod locks it in place and kills any camera shake, guaranteeing a crisp shot every time.
Next, grab a remote shutter release or just use your camera’s built-in timer. The simple act of pressing the shutter button can introduce a tiny vibration that will soften your image. A remote trigger takes your hands off the camera completely, ensuring everything stays perfectly still. It's a cheap accessory that makes a world of difference.
A tripod and remote shutter aren't just nice-to-haves. They're the secret sauce for achieving that tack-sharp focus that makes a diamond sparkle or an engraving stand out.
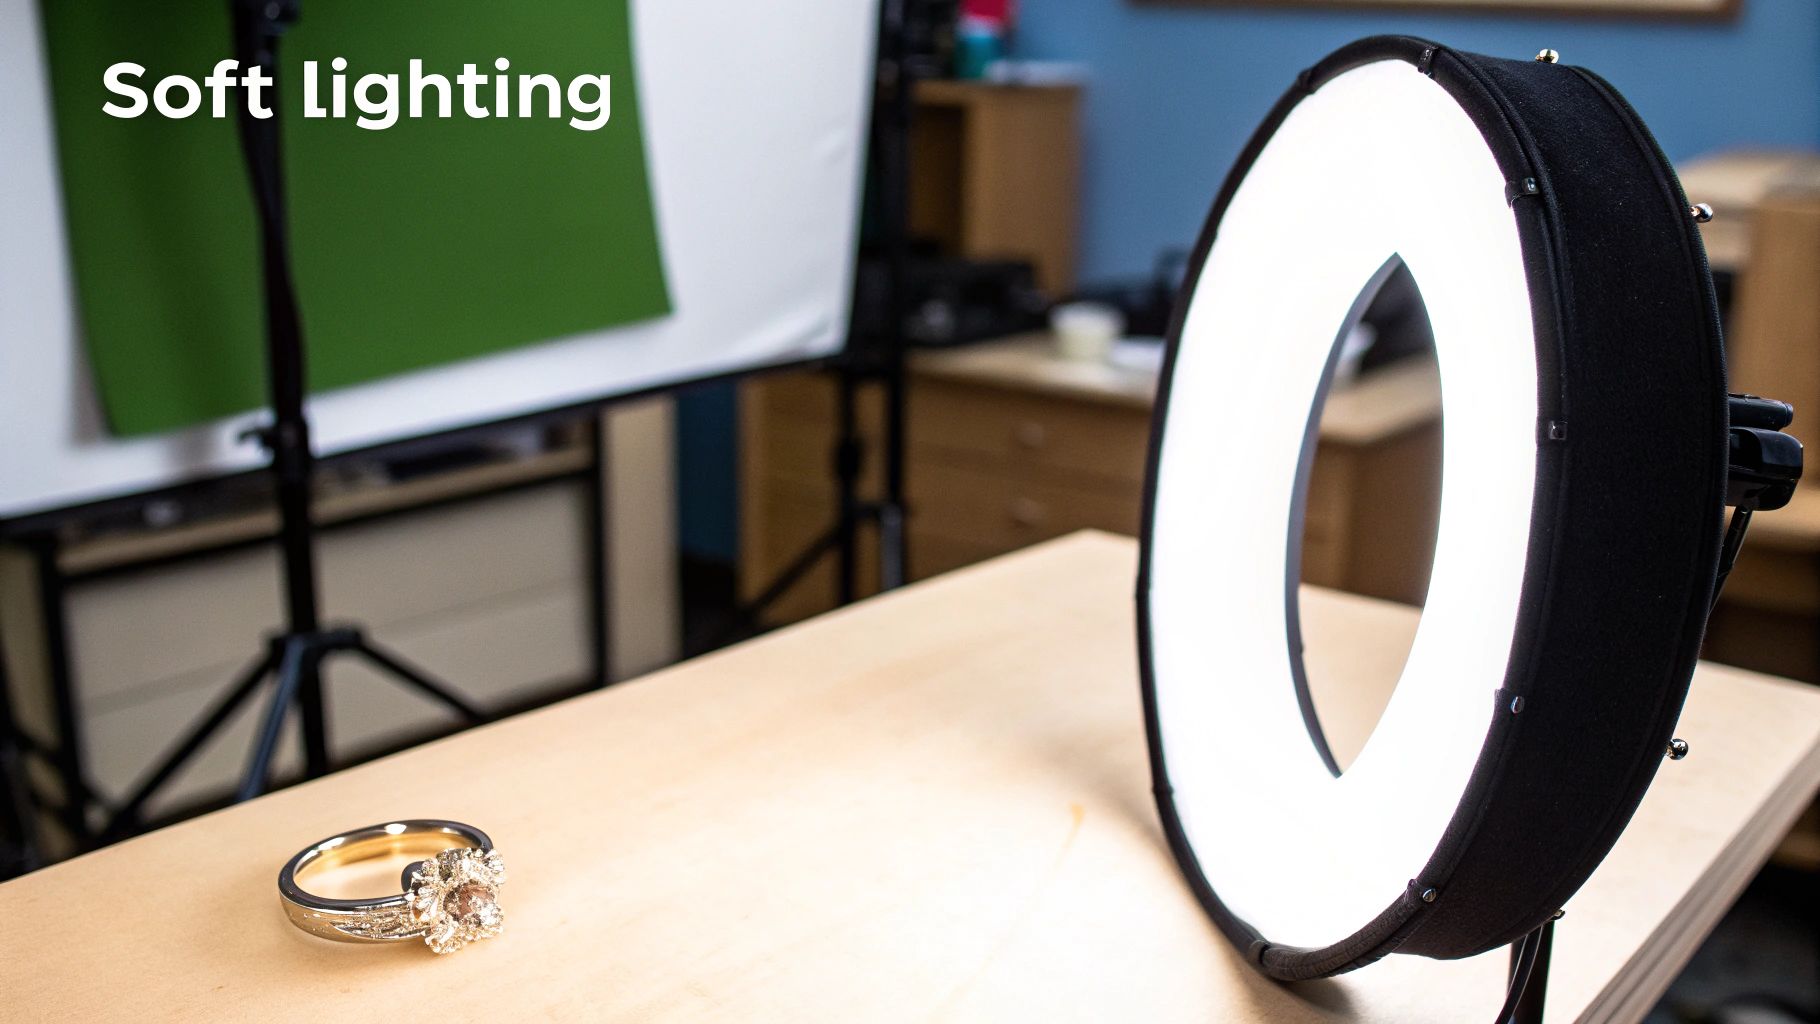
Finally, you’ll want a light tent (or lightbox). This is basically a cube made of white, translucent fabric that diffuses the light from your lamps. The result is soft, even, flattering light that beautifully illuminates metals and gemstones without creating harsh, distracting reflections. This kind of gentle lighting is especially great for highlighting the unique textures found in many types of what is artisan jewelry.
If a light tent isn't in the budget right now, no problem. You can make your own bounce cards with some simple white foam core from a craft store. By placing these cards strategically around the jewelry, you can reflect light back into the shadows, brightening up dark spots and giving the entire piece a balanced, polished look.
Mastering Light to Make Your Jewelry Sparkle
Lighting is, without a doubt, where the real magic happens in jewelry photography. It's the one thing that can transform a decent photo into an absolutely stunning one, making gemstones pop and metals gleam. Get it wrong, and you’re left with harsh glares and unflattering shadows. Get it right, and you’ll reveal every beautiful facet and delicate texture.
Think about the difference between hard light and soft light. Hard light—like direct sun or a bare lightbulb—creates sharp, dark shadows and intense hot spots. For something as small and reflective as jewelry, this is your worst enemy. It highlights every tiny imperfection and creates distracting specular highlights, which are those bright, star-like glares you want to avoid.
What you're really after is soft, diffused light. Picture the gentle light filtering through a window on a cloudy day. It wraps around the subject, softening the shadows and creating smooth, flattering gradients on metal. This is the secret to making your jewelry look as luxurious and high-end as it truly is.
Creating a Simple Two-Light Setup
You don't need a massive studio to get this beautiful soft light. While a light tent is a fantastic tool, you can get incredible results with just two off-camera lights and a couple of softboxes. A softbox is just what it sounds like: a fabric box that fits over your light to spread out and soften the beam.
Here’s a classic, go-to setup that works wonders for me:
- Main Light (Key Light): I place my first light, fitted with a softbox, at about a 45-degree angle to one side of the jewelry. This acts as the primary source of illumination.
- Fill Light: The second light and softbox go on the opposite side, also at a 45-degree angle. I always set this one to a lower power than the main light. Its only job is to gently "fill in" the shadows from the main light, not to completely wipe them out.
This two-light approach creates balanced, dimensional lighting that defines the shape of your jewelry without casting deep, distracting shadows. For a deeper dive, our dedicated guide on lighting techniques for photography covers even more advanced setups.
Taming Those Pesky Reflections
Reflections are the biggest headache in jewelry photography. Period. Every shiny surface acts like a tiny mirror, reflecting you, your camera, and everything else in the room. Learning to manage these is a crucial skill.
This is where those white foam core boards come in. I prop them up strategically around and sometimes even above the jewelry, just outside my camera's view. These boards act as "bouncers," catching the soft light from my flashes and reflecting it back onto the piece. This fills in dark spots and, more importantly, replaces unwanted reflections with a clean, white surface.
Pro Tip: Don't be afraid to use black foam core, too. I often place a small piece of black card to create a thin, dark line along the edge of a ring or bracelet. It sounds counterintuitive, but this technique adds incredible definition and a touch of professional-looking contrast.
Another absolute game-changer is a circular polarizing filter (CPL). This filter screws right onto the front of your lens and works just like polarized sunglasses, cutting down on glare. As you rotate the filter, you can literally watch distracting reflections on gemstones and shiny metals disappear, allowing the true color and detail to come through. It’s one piece of gear I simply can’t shoot jewelry without.
Dialing In Your Camera Settings
Once your lighting is just right, it’s time to take the leap and switch your camera from "Auto" to "Manual." This is where the magic happens. Taking full control of your settings is what separates a decent snapshot from a professional, high-impact jewelry photograph. Don't worry, it's not about memorizing a textbook—it's about understanding how three key settings work together to capture tiny, reflective subjects beautifully.
I'm talking about the "exposure triangle": Aperture, ISO, and Shutter Speed. For jewelry, we’re going to tackle them in that exact order to get the sharpest, cleanest images possible.
First, Maximize Sharpness with a High Aperture
Aperture, shown as an f-stop on your camera (like f/8 or f/11), controls how much of your image is in focus. This is what photographers call depth of field. A low f-stop (like f/2.8) gives you that blurry background effect, which is great for portraits but terrible for product shots.
When you're shooting jewelry, you want every single detail to be tack-sharp—from the prongs holding a diamond to the clasp on a necklace. To achieve this, you need a high f-stop. I always start my sessions at f/11 and often push it to f/16 or even higher. This closes down the lens opening, creating a deep depth of field that keeps the entire piece in crisp focus.
If there's one mistake I see newcomers make over and over, it's using a low aperture. They end up with a photo where only the very front of the ring is sharp, and the rest is a soft blur. A high f-stop like f/11 or higher is your secret weapon for getting that wall-to-wall sharpness that screams professionalism.
Next, Keep Your ISO Low for a Flawless Image
With aperture set, your next move is to dial in the ISO. Set it to the lowest native setting your camera offers—usually 100 or 200. ISO determines how sensitive your camera's sensor is to light, but cranking it up comes at a cost: digital noise, or "grain." A high ISO will make your beautiful, smooth metals look muddy and obscure the very details you're trying to showcase.
Because your camera is locked down on a tripod and you have full command of your lighting, there's absolutely no reason to increase the ISO. Keeping it at its base level ensures you get the cleanest, highest-quality image file your camera can produce. This gives you much more freedom when you get to the editing stage.
As you can see, a clean, simple background is crucial. It puts the focus squarely on the jewelry's intricate design, which is exactly what you want.
Finally, Lock In Perfect Color with a Custom White Balance
Let's talk color accuracy. Auto white balance is notoriously unreliable under studio lights. It can easily misinterpret the scene, giving your stunning yellow gold a sickly green tint or making your brilliant silver look cold and blue.
The solution is simple and incredibly effective: set a custom white balance using a grey card. It takes less than two minutes and makes a world of difference.
- First, place a grey card right where your jewelry will be, lit by your main lights.
- Next, take a picture of the card, making sure it fills most of the frame.
- Then, dive into your camera’s menu, find the custom white balance option, and select the photo you just took of the card.
That’s it. You’ve just taught your camera what true neutral grey looks like under your specific lighting setup. From now on, every metal and gemstone will be rendered with perfect, true-to-life color.
Getting your settings right can feel different depending on the piece you're shooting. A chunky silver cuff needs a slightly different touch than a delicate diamond ring. Here’s a quick-reference table I've put together based on years of experience.
Camera Settings for Different Jewelry Types
| Jewelry Type | Aperture (f-stop) | ISO | White Balance | Focus Technique |
|---|---|---|---|---|
| Diamond Rings | f/11 - f/16 | 100 | Custom (Grey Card) | Manual focus on the main stone |
| Gold Necklaces | f/8 - f/11 | 100-200 | Custom (Grey Card) | Focus on the pendant or clasp |
| Pearl Earrings | f/9 - f/14 | 100 | Custom (Grey Card) | Manual focus on the pearl's surface |
| Gemstone Bracelets | f/11 - f/18 | 100 | Custom (Grey Card) | Focus stacking for full sharpness |
| Silver Watches | f/16 - f/22 | 100 | Custom (Grey Card) | Manual focus on the watch face |
Think of these as solid starting points. The most important thing is to experiment and see what works best for the specific piece in front of you and the story you want to tell.
Styling and Composing Your Shot
Alright, you've got your gear sorted and your settings locked in. Now comes the fun part—the artistry. A technically sound photo is one thing, but a beautifully styled and composed image is what truly tells a story. This is how you make someone fall in love with a piece before they even hold it.
It all starts with the background. Your goal here is to choose a surface that complements the jewelry without stealing the show. For your main e-commerce product shots, a clean, seamless white or light gray background is the gold standard for a reason. It’s simple, distraction-free, and keeps the focus squarely on your beautiful work.
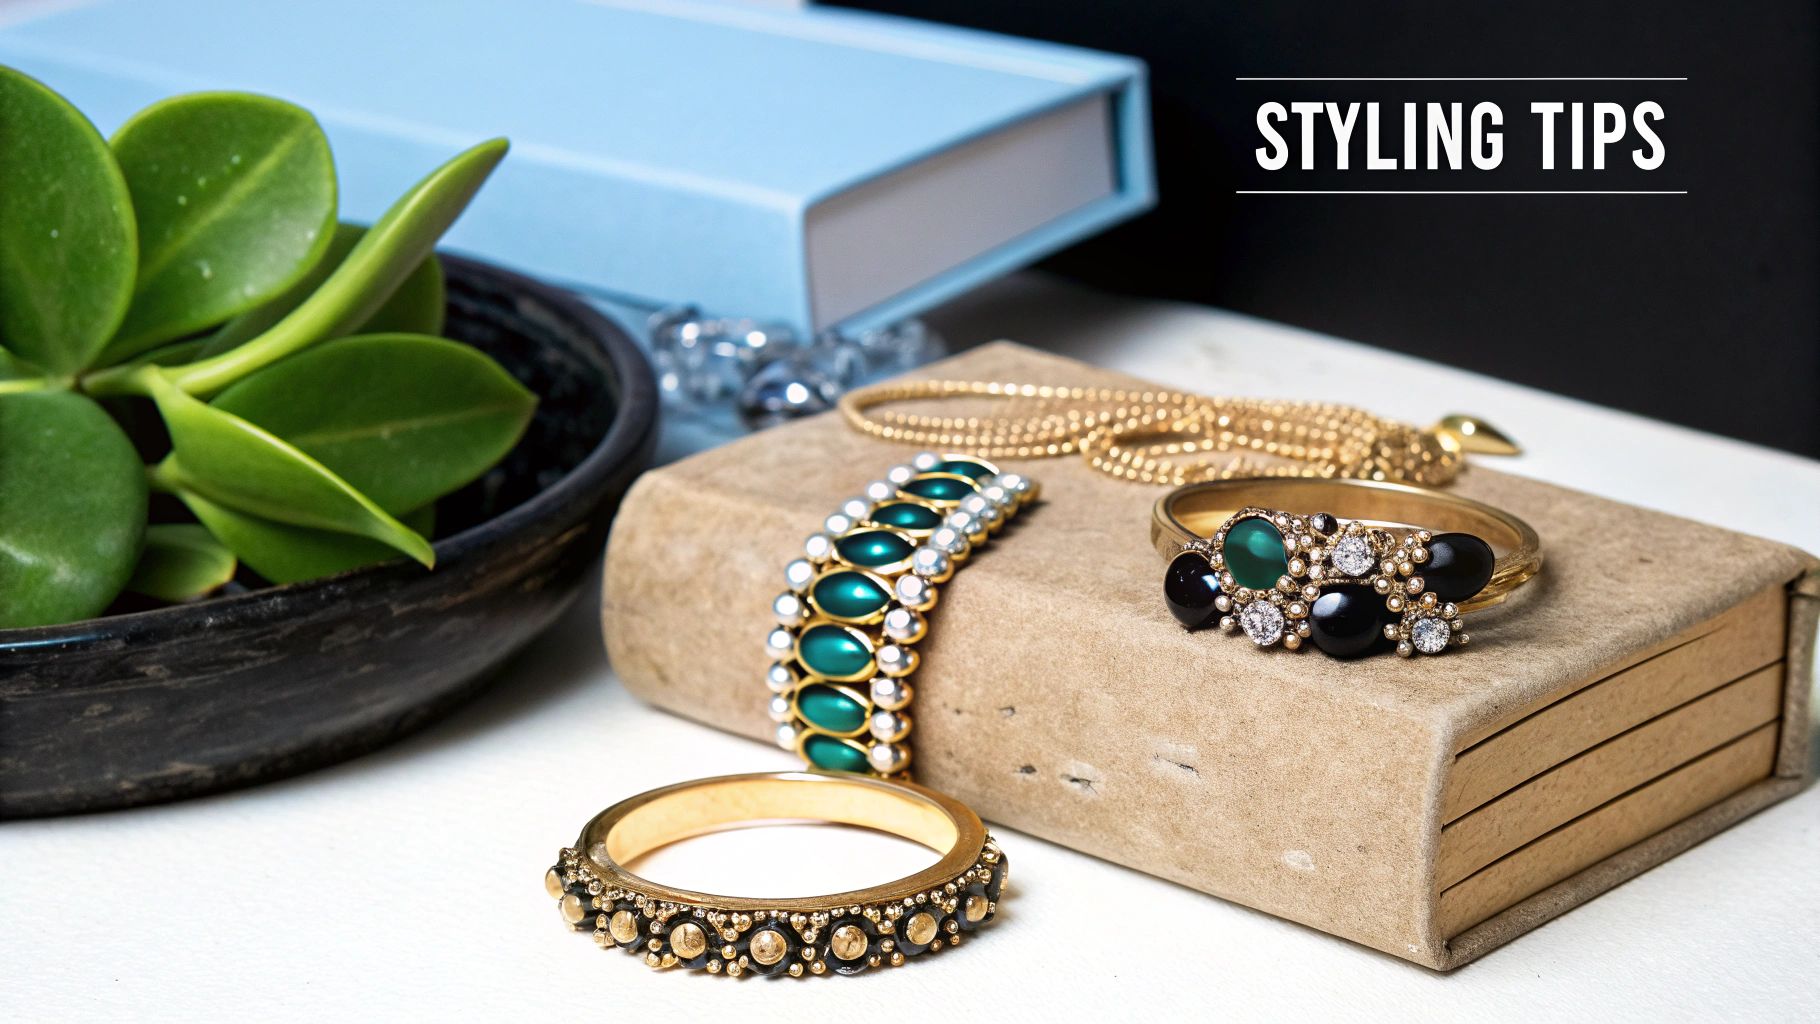
But for social media or lifestyle shots, you can really let your creativity shine. Think about using materials that evoke a certain mood or add a bit of texture.
- Natural Slate: The dark, elegant contrast makes diamonds and silver absolutely sing.
- Polished Marble: Instantly adds a feeling of luxury and class.
- Linen Fabric: Gives off a soft, organic vibe that’s perfect for handcrafted or artisan pieces.
- Distressed Wood: Can create a wonderfully rustic or bohemian feel.
Pro Styling Tips for Flawless Shots
When you're shooting something as small and detailed as jewelry, the little things become the big things. A stray fingerprint or a slightly off-kilter ring can torpedo an otherwise perfect shot, sending you back to Photoshop for a cleanup job you didn't need.
Here’s a non-negotiable tip I’ve learned: always wear cotton gloves when you handle the jewelry. The oils from your skin leave smudges that a macro lens will pick up in glaring detail. A quick, gentle wipe-down before every shot is a must.
Another lifesaver? Dental wax. If you want to get a ring to stand perfectly upright, a tiny piece of dental wax or museum putty is your best friend. It’s just sticky enough to hold the piece steady without leaving any gunk behind. This little trick is how you get those flawless, professional-looking ring shots you see everywhere. For more ideas on creating eye-catching arrangements, check out these creative retail display ideas.
Moving Beyond the Center
Placing your jewelry smack in the middle of the frame is safe, sure, but it can also be a little predictable. To create images with more energy and visual interest, you need to think about composition. The easiest and most effective principle to start with is the rule of thirds.
Just imagine your frame is divided into a 3x3 grid, like a tic-tac-toe board. Instead of centering your subject, try placing it along one of the lines or where two lines intersect. This simple shift creates a more natural, balanced composition that guides the viewer's eye through the frame. It’s a subtle change that makes a massive difference.
The right styling helps customers imagine themselves wearing the piece. It’s about creating an aspirational context that a plain white background can't always provide. For a https://hiddenforever.com/blogs/projection-jewelry/custom-locket-with-photo, showing it in a personal, styled setting enhances its sentimental value.
This isn’t just about making pretty pictures; it’s smart business. Studies show that about 49% of U.S. buyers prefer shopping with small businesses, where authentic and high-quality images help a brand stand out. Photos that incorporate natural elements and a lifestyle feel can boost engagement by as much as 30% over sterile product shots. Styling isn't just fluff—it directly impacts your bottom line.
Essential Photo Editing and Retouching
Getting the shot is really only half the battle. The real magic happens in post-processing, where you take a good photo and turn it into a stunning, commercial-quality image. This is where software like Adobe Lightroom or Photoshop becomes your best friend, and it's a non-negotiable part of photographing jewelry well.
I always start with the basics: exposure, contrast, and highlights. A little bump in contrast can make metals look so much richer. You also want to be careful with your highlights—dialing them in just right can bring out the fire in a gemstone without losing any of the delicate detail. Color is just as critical. Even if you nailed your white balance on set, you'll probably need a few small tweaks to make sure your gold has that perfect warmth and your silver looks clean and crisp.
Cleaning Up Imperfections
Your macro lens is a truth-teller. It will find every speck of dust, every tiny scratch, and every faint fingerprint you thought you wiped away. This is where retouching saves the day.
In Photoshop, the Spot Healing Brush is an absolute lifesaver for this kind of cleanup. Just click on a dust mote, and poof—it’s gone. For anything bigger or more stubborn, I'll switch over to the Clone Stamp Tool. It gives you more control, letting you copy a clean texture from one spot and paint it over a flaw. The trick is to zoom way in and work with a soft-edged brush. Your goal is for the edits to be completely invisible.
Of course, the less you have to fix digitally, the better. A good physical cleaning beforehand makes a huge difference. Our guide on how to clean silver jewelry at home has some great tips for prepping your pieces.
Enhancing Sparkle and Shine
Want to make that jewelry really pop off the screen? It's all about adding dimension. The classic technique for this is called dodging and burning, which is just a fancy term for selectively lightening (dodging) and darkening (burning) specific areas of the photo.
- Dodging: I'll use a soft brush with a low opacity to gently paint light onto the facets of a diamond or the top curve of a gold band. This mimics the way light would naturally hit it and instantly amps up the sparkle.
- Burning: Then, I'll do the opposite in the shadows. Deepening the shadows between details or underneath the piece creates contrast and makes the bright parts feel even brighter.
I like to think of dodging and burning as digital sculpting. You’re not actually changing the piece, you’re just enhancing its natural shape and brilliance to guide the viewer’s eye. A light touch here goes a long way.
The last thing you’ll do is get the image ready for its final destination. For most e-commerce sites, that means putting it on a pure white background. The Pen Tool is your best bet for making a super precise cutout of your jewelry. Once it's selected, you can just drop it onto a new white layer.
After all that work, don't forget the final, crucial technical step. You need to learn how to optimize website images so they load quickly without sacrificing quality. A slow-loading product page is a guaranteed way to lose a sale.
Your Top Jewelry Photography Questions, Answered
When you're first learning how to photograph jewelry, a few common questions always seem to pop up. Let's tackle some of the biggest hurdles photographers run into so you can get those crisp, professional shots you're after.
Can I Really Get Good Shots with Just My Phone?
You absolutely can. While a DSLR with a dedicated macro lens gives you the most control, you can still capture stunning images with your smartphone. The key is to stop treating it like a phone and start treating it like a serious camera.
First, lock it down. Get a small tripod to eliminate any chance of blur from shaky hands. Then, find some beautiful, soft natural light—think next to a window on an overcast day. You want to avoid harsh, direct sunlight at all costs. The most important step? Switch over to your phone's "Pro" or "Manual" mode. This lets you take control of settings like ISO and white balance, giving you way more creative power than the standard automatic mode.
How Do I Deal with All Those Awful Reflections?
Ah, reflections. They are easily the biggest headache in jewelry photography. The trick isn't to eliminate them completely, but to control them by surrounding your piece with large, soft light sources. A light tent is a fantastic tool for this because it wraps your jewelry in beautifully diffused light, which smooths out those harsh, distracting glares.
My favorite trick? It's not just about adding light, but also about shaping it. I use small white foam cards just out of the camera's view to bounce soft light back into the shadows. You can even use black cards to create those sharp, defined lines on metal that you see in high-end watch ads. It's a simple move that adds a serious touch of professional contrast.
What's the Best Background to Use?
For your standard product shots on an e-commerce site, you can't go wrong with a pure white or light grey background. It's the industry standard for a reason: it's clean, keeps the focus entirely on the product, and works perfectly for online marketplaces that have strict image requirements.
But when you're shooting for social media, your brand's lookbook, or a lifestyle campaign, it's time to have some fun. Textured backgrounds like marble, slate, rich wood, or even a simple piece of linen can add a layer of luxury and context to the shot. Just remember the golden rule: the background should always complement the jewelry, never overpower it.
At Hidden Forever, we believe the beauty of jewelry lies in the personal stories it holds. Our unique projection jewelry is designed to keep your most precious memories close. Explore our collection and find the perfect piece to tell your story today.