

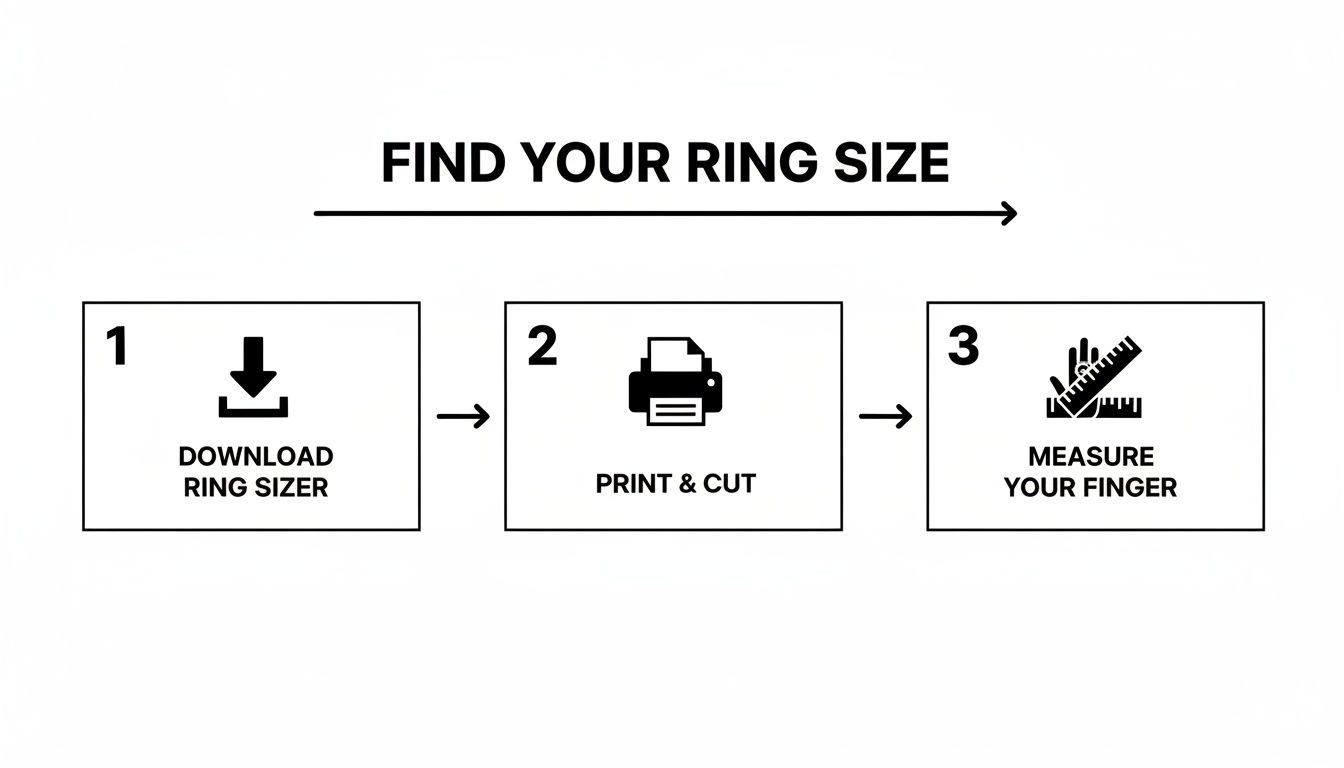
A printable ring sizer chart is one of the easiest ways to figure out your ring size right from your own home. It’s a simple tool, but it's surprisingly effective. It gives you two reliable ways to get your measurement: one using a small paper strip for your finger, and another for checking the size of a ring you already own. It's all about taking the guesswork out of buying jewelry online.
Find Your Perfect Ring Size Without Leaving Home
Let’s be honest, getting the right ring size online can feel like a shot in the dark. This guide is here to take away that uncertainty. We'll show you how to use a simple printable chart to find your perfect fit, so you can forget about the hassle of returns or paying for resizing. Our goal is to help you click "buy" with complete confidence, every single time.
This little tool has become more important than ever. With the massive shift to online jewelry shopping—a global market estimated at over $80 billion in 2023—getting the size right from the start is key. Think about it: roughly 40–50% of rings bought online are gifts. A printable chart helps keep those surprises safe, especially for meaningful pieces like promise rings or our unique projection photo jewelry where the right fit is part of the magic.
Why At-Home Sizing Is a Game Changer
Using a printable chart just makes sense. It’s a practical solution with some real advantages for anyone shopping for rings online.
- Convenience: Measure your ring size whenever you want, wherever you are. No trip to the jewelry store necessary.
- Accuracy: As long as you print it correctly (we'll show you how), the chart is a reliable way to get an accurate measurement.
- Cost-Effective: It’s totally free. More importantly, it helps you avoid the extra cost and headache of getting a ring resized.
- Perfect for Gifts: This is my favorite part. You can secretly borrow one of your partner's rings and measure it on the chart. Surprise saved.
Key Takeaway: It’s not about finding just any size—it’s about finding your size. A great fit means the ring is comfortable enough to wear all day, every day, but snug enough that you never have to worry about it slipping off.
What You Will Learn in This Guide
Think of this guide as your go-to resource for mastering the printable ring sizer. We’ll walk you through the whole process, from hitting "print" to understanding what a perfect fit really feels like. You'll learn the two main ways to use our chart to nail down your size.
First, we'll go over the paper strip method, which is perfect for measuring your finger directly. Then, we'll show you how to use a ring you already own and love to find its size on the chart. For an even deeper dive, our comprehensive Hidden Forever ring size guide has more tips and details to help you out.
How to Print Your Ring Sizer for an Accurate Reading
Getting an accurate ring measurement at home starts with a perfectly printed chart. Honestly, this is the most critical part of the whole process. If the print is even slightly off, your size will be wrong.
Let's walk through how to get your printer settings just right to make sure your ring sizer chart is scaled perfectly and ready to use.
The secret is printing the file at 100% scale. You might see this setting called "Actual Size" or "No Scaling" in your print options. Whatever you do, avoid settings like "Fit to Page" or "Scale to Fit." Those options will automatically shrink or enlarge the chart, throwing off your measurement. Even a tiny error here can mean ordering a ring that’s a full size too big or too small.
Finding the Correct Printer Settings
Diving into a print dialog box can feel a little technical, but finding the right setting is usually straightforward. The exact location just depends on whether you're on a Windows PC or a Mac.
If you're on a Windows computer, click "Print" and look for a section labeled "Page Sizing & Handling." You'll see a few options, but the one you need to select is "Actual Size." This tells your printer to print the document exactly as it was designed, without any automatic adjustments.
For Mac users, the steps are pretty similar. Once you open the print dialog, find the "Scale" field. You'll want to make sure it’s set to 100%. Be sure to leave the "Scale to fit" box unchecked. This simple click prevents your Mac from resizing the chart to match your paper's margins.
Verifying the Print Scale with a Ruler
Okay, so you've printed the chart. Before you do anything else, you have to make sure it printed correctly. This step is non-negotiable if you want an accurate size.
Our chart includes a handy reference ruler right on the page for this exact reason.
Grab a physical ruler and hold it up against the printed scale on the paper. Do the lines match up perfectly? If they do, you’re all set. If not, it means the printer settings weren't quite right. You’ll need to go back, double-check that you selected "100% Scale" or "Actual Size," and print it again.
My biggest tip: Never, ever trust a printout without checking the scale first. It takes 30 seconds to verify with a ruler, and it can save you the headache of receiving a gorgeous ring that you can't even wear.
Using a Credit Card as a Backup Check
What if you don't have a ruler nearby? No worries. A standard credit card or your driver's license works just as well. These cards are made to a standard width of approximately 3.37 inches (or 85.6 mm), making them a surprisingly reliable tool for this job.
You'll notice our printable chart has a box the exact size of a credit card. Just place your card over the guide on the paper. If it fits neatly inside the lines, your chart is printed to scale and good to go. If there’s a gap or the card hangs over the edge, it’s time to revisit those print settings and give it another try.
While we're focused on getting a great print at home, it's worth knowing that if you ever need ultra-precise prints, exploring professional printing service features can be helpful. They use calibrated equipment that guarantees perfect scaling every time. But for our purposes, this simple check—with a ruler or a card—is your final quality control step to ensure your at-home measurement is just as reliable as one you'd get from a jeweler.
Measuring Your Finger With the Paper Strip
Alright, you've got your ring sizer chart printed and you’ve confirmed it’s the right scale. Now for the fun part: actually measuring your finger. We'll be using the paper strip sizer from your printout, which is a surprisingly effective little tool. Let's walk through how to get an accurate reading, including how to handle those tricky, wider knuckles.
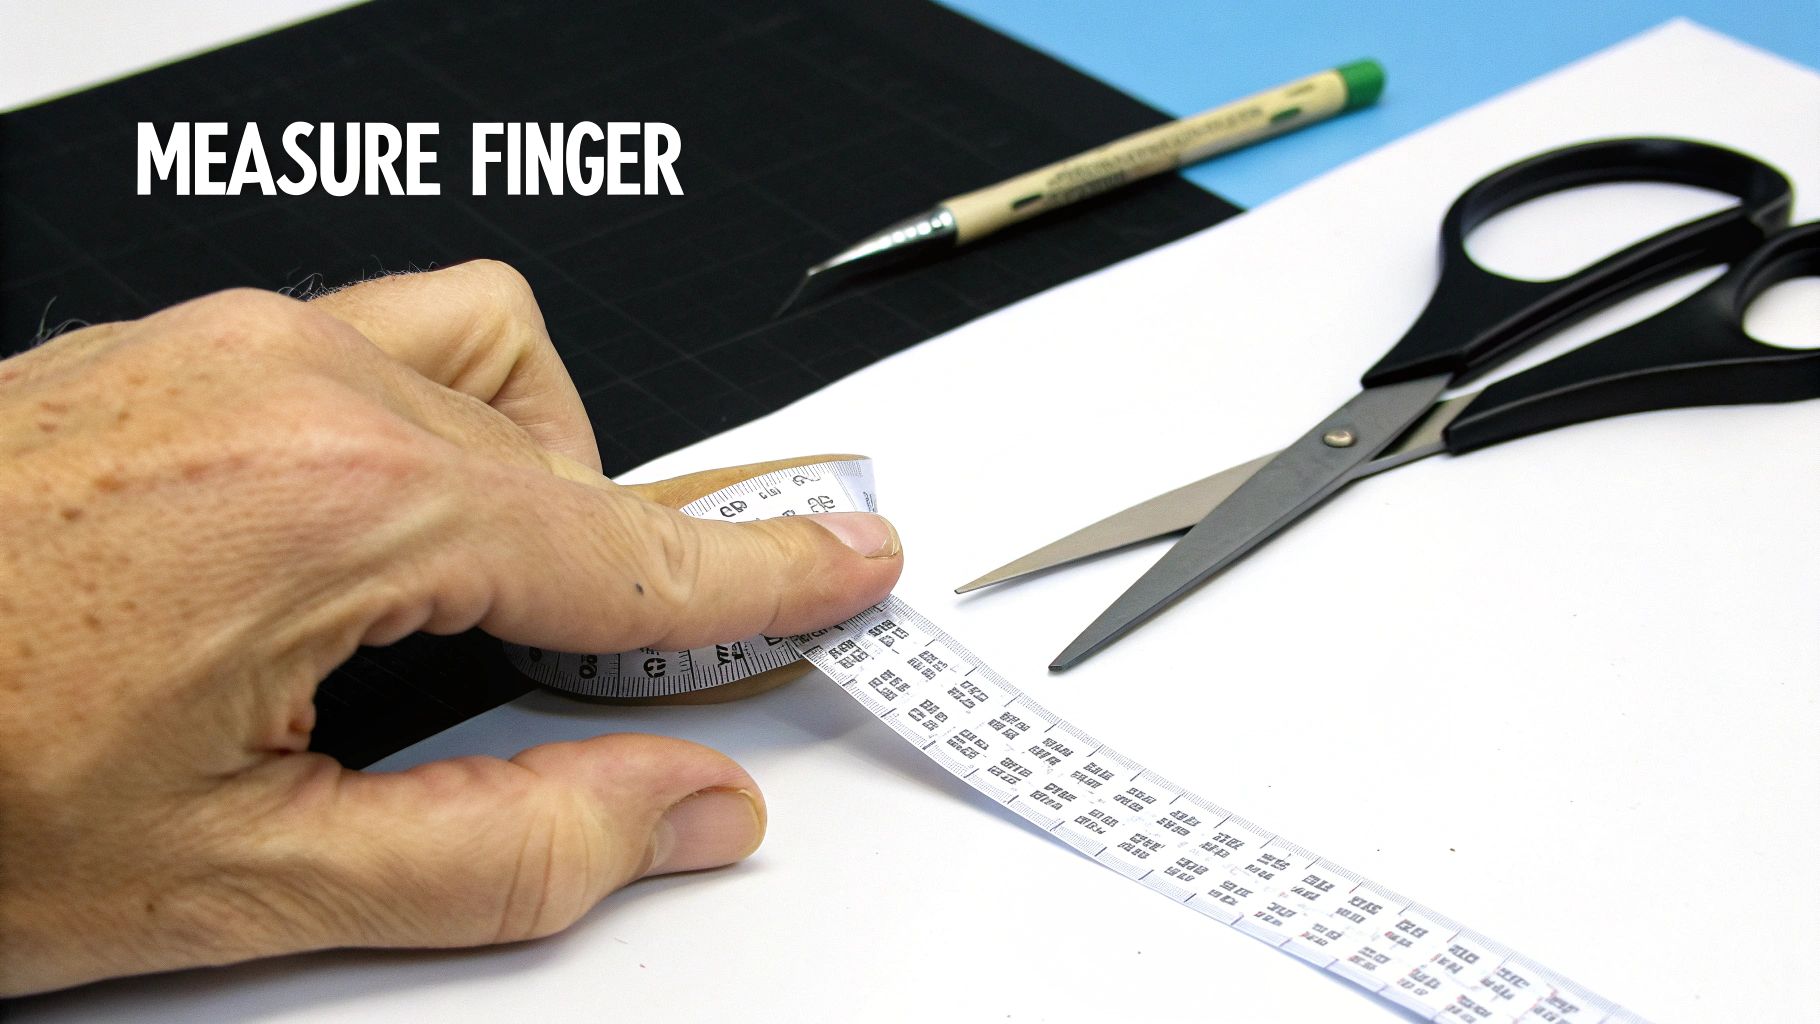
First things first, grab a good pair of scissors and carefully cut out the paper strip sizer. Take your time with this—a clean, straight cut is the first step toward getting a measurement you can trust.
Getting the Tension Just Right
With the sizer cut out, wrap it around the base of the finger where you'll be wearing the new ring. This is the most crucial step, and getting the tension correct makes all the difference. You're looking for a snug fit, but it shouldn't be so tight that it's pinching your skin or making your finger bulge.
Think of it like a real ring. It should feel secure and not slide around on its own, but you should still be able to twist it with a little bit of effort. If the paper is straining or feels uncomfortably tight, loosen it up a bit.
Pro Tip: A great way to check the fit is to slide the paper sizer over your knuckle after you've wrapped it. If it comes on and off with just a little resistance, you've probably nailed it. If you have to really yank it, it's too tight.
How to Read Your Measurement
Once the sizer feels right, find the number or mark that lines up with the end of the strip. That's your ring size! It’s a good idea to do this a couple of times just to be sure you get a consistent result.
- Take Your Time: Rushing this part can lead to an inaccurate size. A tiny adjustment can change everything.
- Measure More Than Once: Your fingers can swell and shrink throughout the day. Try measuring two or three times, preferably in the afternoon when they're typically at their largest.
- Don't Forget Your Dominant Hand: Your dominant hand is often a bit bigger, so always measure the exact finger the ring will be worn on.
This hands-on method is incredibly reliable. For a more visual walkthrough, check out our complete guide on how to measure for a ring size, which covers a few different techniques.
What if My Knuckle Is Bigger Than My Finger?
This is a super common issue. Many people have knuckles that are wider than the base of their finger, which can make finding the right size a real puzzle. You need a ring that can get over the knuckle without being so loose that it spins around once it’s on.
If this sounds familiar, don't worry. The solution is pretty simple: you just need to take two measurements.
Start by measuring the base of your finger using the paper strip, just as we discussed. Write that size down. Then, do the same thing, but this time measure the widest part of your knuckle. Jot that number down, too.
Your perfect ring size will be somewhere between those two measurements. For instance, if your finger base is a size 7 but your knuckle is closer to a 7.5, you should definitely go with the size 7.5. This ensures the ring will slide on comfortably but won't be overly loose. When in doubt, it’s almost always better to choose the slightly larger size to prevent the ring from getting stuck.
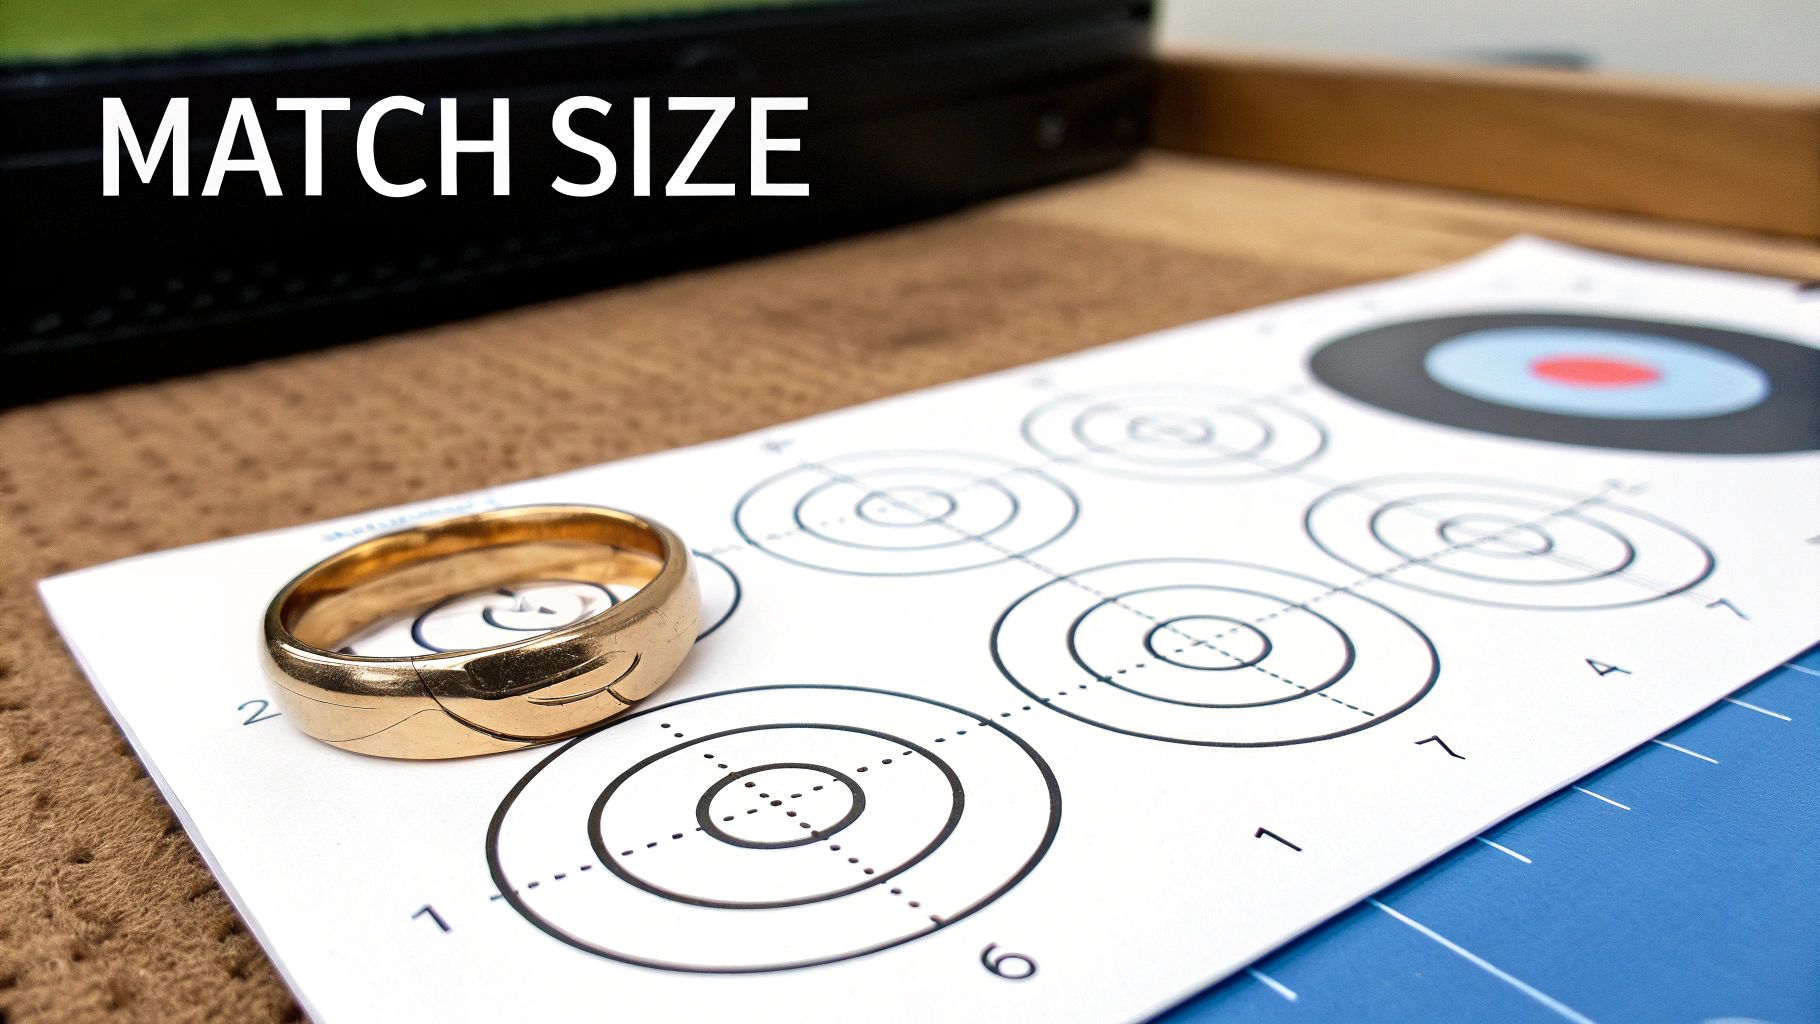
Using an Existing Ring to Find the Right Size
Have a ring that already fits you perfectly? You’re in luck. This is one of the easiest shortcuts to finding your ring size, and it's often more accurate than fiddling with a paper strip.
This method is also a lifesaver for gift-giving. If you’re planning a surprise, you can discreetly borrow one of your partner’s rings, measure it against our chart, and have it back in their jewelry box before they even notice it’s gone. A little detective work now makes for a perfect reveal later.
Picking the Right Ring to Measure
Before you start, you need to choose the right ring from your collection. Grab a ring that you wear on the exact same finger you plan to wear your new one on. It's a small detail, but it matters—your fingers on your dominant hand are often a little larger, so a ring for your right hand might be too snug for your left.
The width of the band is also a big deal. A wide, chunky band will fit much more snugly than a delicate, thin one.
- Wide Bands (5mm or more): These take up more real estate on your finger and generally feel tighter.
- Thin Bands: These have a bit more wiggle room and can feel looser.
If you measure a thin band to size a wide one, you'll likely end up with a new ring that's uncomfortably tight. When in doubt, try to match the band styles as closely as you can.
Matching Your Ring to the Chart
Once you've got your ring, the rest is straightforward. Lay your printed chart on a flat surface—a desk or kitchen table works great. Then, simply place your ring on top of the sizing circles.
The goal is to find the circle that fits snugly against the inside edge of your ring. Slide the ring from one circle to the next until the black printed line is perfectly visible just inside the band, touching the inner edge all the way around. You shouldn't see any white space between the ring and the circle's outline.
Key Insight: Don't match the outside of the ring! Ring sizes are all about the inner diameter. Matching the inside edge is the only way to get an accurate measurement.
Converting Diameter to US Ring Size
Once you’ve found the perfect circle, you can use its diameter measurement to find the corresponding US ring size. This table makes it easy to convert your finding.
Ring Diameter to US Size Conversion
| Inner Diameter (mm) | US Ring Size |
|---|---|
| 14.9 | 4 |
| 15.7 | 5 |
| 16.5 | 6 |
| 17.3 | 7 |
| 18.2 | 8 |
| 19.0 | 9 |
| 19.8 | 10 |
| 20.6 | 11 |
| 21.4 | 12 |
| 22.2 | 13 |
Just find the inner diameter from the chart on the left, and you'll have your standard US ring size on the right.
Tips for a Precise Match
A steady hand and a good eye make all the difference here. A few simple tricks can help you nail the measurement on the first try.
- Look Straight Down: Don't view the chart from an angle. Leaning to the side can create a parallax error, making it look like the ring fits a different circle. Hover directly over the chart for a true view.
- Keep it Flat: Make sure the ring is lying completely flat on the paper. If it’s tilted, even a little, your measurement will be off.
- Check for a Perfect Outline: The right circle should look like it was drawn perfectly for the inside of your ring. If the metal band covers part of the black line, the circle is too big. If you see paper between the band and the line, the circle is too small.
This method is especially handy for sentimental pieces like a custom ring with a photo inside, where getting the size right the first time is essential. By using a ring you know already fits, you can order with confidence, knowing that special gift will be cherished from the moment it’s opened.
Expert Tips for an Accurate Measurement
Getting a number from a printable ring sizer is a great start, but the little tricks of the trade are what really guarantee a perfect fit. Jewelers know that small details, like your body’s natural rhythms and the style of the ring, can make all the difference. Nailing these factors will give you total confidence in your measurement.
One of the biggest variables is simply timing. Your fingers actually change size slightly throughout the day, swelling or shrinking based on temperature, what you've eaten, and how active you’ve been.
Finding the Best Time to Measure
For the most accurate reading, always measure your finger in the late afternoon or evening. Your fingers tend to be at their largest then, after you've been moving around all day. Measuring first thing in the morning can give you a deceptively small size.
On that same note, never measure when your hands are cold. Cold makes your fingers shrink, which might lead you to pick a size that feels painfully tight once you warm up. The goal is to measure in a comfortable, room-temperature setting.
Why You Should Measure More Than Once
A single measurement is just one moment in time. To get the real story, I always recommend measuring your finger three or four separate times across a couple of different days.
This simple step helps you find a reliable average and smooths out any of those daily fluctuations. If you get the same result on Tuesday evening and again on Thursday afternoon, you can feel confident you’ve found your true size.
Jeweler's Insight: Think of it like taking a few photos to get the perfect shot. The first one might be okay, but a few more attempts ensure you capture the absolute best result. Consistency is everything when it comes to ring sizing.
How Band Width Affects Your Ring Size
Here’s something many people miss: not all rings fit the same, even if they have the same size number stamped inside. The width of the band itself plays a massive role in how a ring feels on your finger.
Simply put, a wider band takes up more real estate on your finger. This creates more friction and a much snugger fit.
- Wide Bands (over 5mm): If you're looking at a ring with a thick, substantial band, you should almost always go up a half-size from what you measured. That little bit of extra room makes all the difference in comfort.
- Thin Bands (under 2mm): On the flip side, a delicate, skinny band has less contact with your skin and can feel a bit looser. For these styles, you can usually stick with your exact measured size.
Thinking about the band width is critical for all-day comfort. The type of metal can also affect the fit, and if you have sensitive skin, choosing the right material is just as important as the size. Our guide to the best jewelry for sensitive skin can walk you through finding a metal that looks great and feels even better.
When you combine a precise measurement with these pro considerations, you're all set for a perfect, comfortable fit you'll never want to take off.
Common Ring Sizing Questions Answered
Even with the right tools, finding your perfect ring size can feel a bit tricky. It’s more of an art than a science sometimes! Let's walk through some of the most common questions that pop up, so you can feel totally confident in your measurement.
What Should I Do If My Measurement Is Between Two Sizes?
This happens all the time, so don't sweat it. If you find yourself stuck between, say, a size 7 and a 7.5, the golden rule is to choose the larger size.
Think of it this way: a ring that's a tiny bit loose is still comfortable and easy to wear. A ring that’s too tight? It’s either not going on, or it’s going to be really uncomfortable. This is especially true for rings with wider bands (anything over 5mm). A wider band covers more real estate on your finger, which naturally makes it feel snugger, so that little bit of extra room can make all the difference.
The only exception might be for super delicate, thin bands where you want to minimize spinning. But for the most part, when in doubt, size up. It's the safest and most comfortable choice.
How Does My Knuckle Affect My Ring Size?
If you have knuckles that are larger than the base of your finger, you’ve got to factor them into the equation. The goal is to find a size that can comfortably slide over the knuckle without being so loose that it spins around once it’s on.
Here’s the simple way to tackle this:
- First, use your sizer (like the paper strip method) to measure the widest part of your knuckle.
- Next, do the same for the base of your finger where the ring will actually sit.
- Your perfect size is usually the happy medium right between those two measurements.
So, if your finger base measures a size 6 but your knuckle is a size 7, a size 6.5 will likely be your sweet spot. It’ll be just big enough to wiggle over the joint but will stay put once it's in place.
A Real-World Example: I once helped a friend who was convinced he was a size 9 based on his finger measurement. The problem was, he couldn't get a size 9 ring past his knuckle. We measured his knuckle and it was a size 10. He ordered a 9.5 and it was perfect—snug enough not to fall off, but with just enough room to slide on without a fight.
When Is the Best Time of Day to Measure My Finger?
Believe it or not, your finger size changes throughout the day. Things like what you've eaten, the temperature, and your activity level all have an effect. For the most accurate and reliable measurement, you’ll want to size your finger at the end of the day.
Your fingers are naturally a bit larger in the late afternoon and evening. If you measure first thing in the morning, you're likely to get a smaller reading that won't be accurate later on.
Also, a big one: never measure when your hands are cold! The cold makes your fingers shrink, which could lead you to pick a size that’s painfully tight once you warm up. The ideal time is in a comfortable, room-temperature environment when you’re relaxed. For ultimate accuracy, try measuring a few times over a couple of evenings to find a consistent result.
Does This Printable Sizer Work for Men's Rings?
Absolutely. Ring sizing is universal. Our printable sizer works just as well for men's rings as it does for women's or any gender-neutral style. The method for measuring a finger or an existing ring doesn't change.
The only real difference is the typical size range you see. Men’s rings often fall between sizes 8 and 14, while women's are more commonly between sizes 5 and 8. But the measurement itself is exactly the same. Our chart covers a wide spectrum of sizes so anyone can find their fit. This is also great to know when shopping for a promise ring—you can learn more in our guide about what ring a promise ring goes on.
Getting these little details right is what separates a good fit from a perfect one. If you're curious about how online stores use helpful guides like this to serve their customers, you might find some interesting parallels in learning how to start an ecommerce business. Ultimately, taking the time to measure correctly ensures you’ll get a ring you’ll love wearing for years.
At Hidden Forever, we believe a perfect fit is part of the magic. Our projection photo rings are meant to hold your most precious memories, and we want them to feel comfortable and secure from the moment you put them on. Find your perfect size and let's create a keepsake you’ll cherish forever.
Explore our collection at https://hiddenforever.com